From Clomosy Docs
TMemo is a multiline text editing control, providing text scrolling. Use TMemo to place a standard multiline edit control on a form. Multiline edit boxes allow the user to enter more than one line of text. They are appropriate for representing large amounts of text. The text in the memo control can be edited as a whole or line by line.
AddNewMemo(xOwner:TComponent; xName,xCaption:String)
TComponent : The variable name of the defined component is written. Here you should write the component variable name of whatever your component will be in.
xName : The name of the defined TclMemo should be written.
xPromptText : A hint or message to be displayed when the Text property is empty.
Let's create a TclMemo.
1. Create a new project.
2. You need to define TclMemo on the form. To do this, you should add under the var parameter on the ide as follows. It is the name of your variable you typed at the beginning. You should define this as you want and add it as TclMemo.
var
noteMemo : TclMemo;
3. Add the TclMemo to the form. For this, you must add the begin end block and add it inside the form after the form is defined. By saying MyForm.AddNewMemo, we actually add to the form we have defined. Here, you need to add your form definition as whatever you wrote it.
noteMemo := MyForm.AddNewMemo(MyForm,'noteMemo','Test Memo Message');
4. If you do not want to define it in the form, you can add it in another component (such as Layout, Panel). Of course, before that, that component must be defined.
testLayout := MyForm.AddNewLayout(MyForm,'testLayout');
noteMemo := MyForm.AddNewMemo(testLayout,'noteMemo','Test Memo Message');
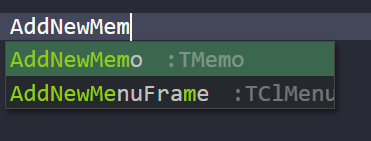
5. While defining the component, you can define it manually by typing. Another method is to write its shortcut. If you type "AddNewMemo" while the shortcut is in the code block, a pop-up menu will appear.
As soon as you click, the following block will come automatically.
AddNewMemo(xOwner:TComponent; xName,xCaption:String)(xObjectName : String);
6. We gave the variable name while defining the TclMemo in var. Now when you add this in begin end you should use this variable name in all definitions. Your code will throw an error when you write these variable names incorrectly.
7. You can print a message to your TclMemo component as the last parameter when defining your project. This title is the text that will appear on the screen when the application is run. You may not want to write when defining this title. An empty TclMemo will appear on the screen.
noteMemo := MyForm.AddNewMemo(MyForm,'noteMemo','');
8. Now let's design our TclMemo component. Let's set the width and height first. For this, you must make the following definitions.
noteMemo.Height := 50;
noteMemo.Width := 150;
9. With the Align parameter, you can specify where you want our component to be aligned in the form. This parameter has multiple positioning properties. See the page to learn about these features. We're going to call it the top part here. So we have to write "AlTop".
noteMemo.Align := alTop;
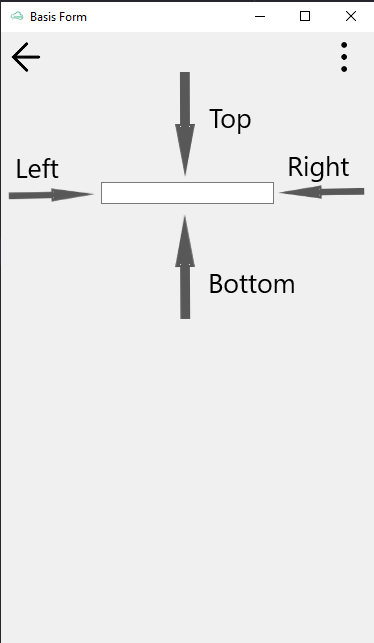
10. With the Margins parameter, you can give margins at any scale from the right, left, bottom, top.
noteMemo.Margins.Left:= 100;
noteMemo.Margins.Right:= 100;
noteMemo.Margins.Top:= 100;
noteMemo.Margins.Bottom:= 10;
11. You may want to change the appearance of the text in the tag. We will use the TextSettings parameter for this.In order to use this parameter, you have to make the following definition. Otherwise your commands will not work.
noteMemo.StyledSettings := ssFamily;
To adjust the text size;
noteMemo.TextSettings.Font.Size := 20;
12. If you want to prevent writing on TclMemo component, you should write the following piece of code.
noteMemo.ReadOnly := True;
13. 'Count' is used to get the number of rows in TclMemo. Use of;
integerValue := noteMemo.Lines.Count;
14. 'Add' is used to add data to new row in TclMemo.
noteMemo.Lines.Add('Hello World');
15. If you are going to enter a single line text in TclMemo, the following code can be used.
MyMemo.Text := 'TMemo is a multiline text editing control, providing text scrolling. Use TMemo to place a standard multiline edit control on a form. Multiline edit boxes allow the user to enter more than one line of text. They are appropriate for representing large amounts of text. The text in the memo control can be edited as a whole or line by line.';
16. If you want to delete a line in TclMemo, you can use the 'Delete' command. You must specify the number of lines as a parameter in the delete command.
noteMemo.Lines.Delete(i); //i : number of rows to be deleted
17. When a very long text is written in TclMemo, the line shifts sideways. To prevent this, that is, to set it to go to the bottom line when it comes to the end of the line;
noteMemo.TextSettings.WordWrap := True;
18. To tell you the truth, you have created a simple application that does nothing yet. Let's save and start using our project. You can save in one of two ways:
Click the save icon (the button in the upper right corner) or press Ctrl + S to save the project and see what you've done on the platforms now.
Example:
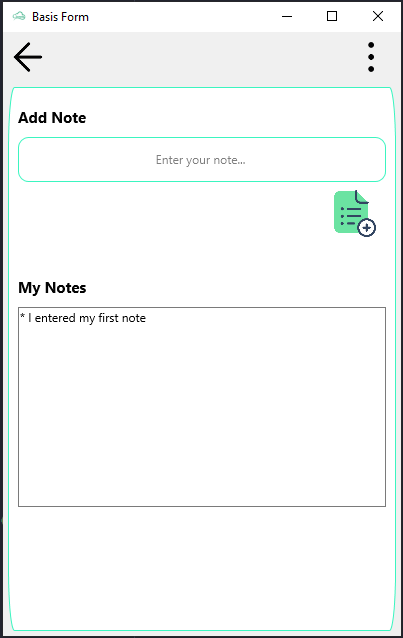
In the example, a text is entered into a TclProEdit. This text is added to TclMemo via the button. We have implemented a simple application for the use of TclMemo. You can improve this application.
var
 MyForm:TFrmClomosyBasisForm;
 topLyt, btnLyt, bottomLyt : TclLayout;
 noteEdt : TclProEdit;
 addBtn : TclProButton;
 noteAddLbl, notesLbl :TclProLabel;
 mainPanel : TclProPanel;
 noteMemo : TclMemo;

  procedure BtnOnClick;
  begin
   noteMemo.Lines.Add('* '+noteEdt.Text);
   noteEdt.Text := ;
  end;

begin
  MyForm := TFrmClomosyBasisForm.Create(Self);

  mainPanel:=MyForm.AddNewProPanel(MyForm,'mainPanel');
  clComponent.SetupComponent(mainPanel,'{"Align" : "Client","MarginBottom":5,"MarginTop":5,
  "MarginRight":5,"MarginLeft":5,"RoundHeight":60,
  "BorderColor":"#3bf5c0","BorderWidth":1}');

  topLyt := MyForm.AddNewLayout(mainPanel,'topLyt');
  topLyt.Align:=ALMostTop;
  topLyt.Height := 150;

  noteAddLbl := MyForm.AddNewProLabel(topLyt,'noteAddLbl','Add Note');
  clComponent.SetupComponent(noteAddLbl,'{"Align" : "MostTop","Width" :150,"MarginLeft":10,"MarginTop":20,
  "Height":20,"TextColor":"#030303","TextSize":15,"TextVerticalAlign":"center",
  "TextHorizontalAlign":"left","TextBold":"yes"}');

  noteEdt := MyForm.AddNewProEdit(topLyt,'noteEdt','Enter your note...');
  clComponent.SetupComponent(noteEdt,'{"Align" : "Top",
  "Height":45,"RoundHeight":10,"RoundWidth":10,"BorderColor":"#3bf5c0","MarginLeft":10,"MarginRight":10,
  "MarginTop":10,"BorderWidth":1}');

  btnLyt := MyForm.AddNewLayout(topLyt,'btnLyt');
  btnLyt.Align:=ALBottom;
  btnLyt.Height := 50;

  addBtn := MyForm.AddNewProButton(btnLyt,'addBtn','');
  clComponent.SetupComponent(addBtn,'{"Align" : "Right","MarginRight":10,
  "Width":70}');
  MyForm.AddNewEvent(addBtn,tbeOnClick,'BtnOnClick');
  MyForm.SetImage(addBtn,'https://img.icons8.com/parakeet/256/add-list.png');

  bottomLyt := MyForm.AddNewLayout(mainPanel,'bottomLyt');
  bottomLyt.Align:=ALTop;
  bottomLyt.Height := 100;
  bottomLyt.Margins.Top := 20;

  notesLbl := MyForm.AddNewProLabel(bottomLyt,'notesLbl','My Notes');
  clComponent.SetupComponent(notesLbl,'{"Align" : "MostTop","Width" :150,"MarginLeft":10,"MarginTop":20,
  "Height":20,"TextColor":"#030303","TextSize":15,"TextVerticalAlign":"center",
  "TextHorizontalAlign":"left","TextBold":"yes"}');

  noteMemo := MyForm.AddNewMemo(bottomLyt,'noteMemo','');
  noteMemo.Align := alTop;
  noteMemo.Height := 200;
  noteMemo.Width := 150;
  noteMemo.Margins.Left:= 10;
  noteMemo.Margins.Right:= 10;
  noteMemo.Margins.Top:= 10;
  noteMemo.ReadOnly := True;
  noteMemo.TextSettings.WordWrap := True;

  MyForm.Run;

end;


